A Step-by-Step Guide to Creating a Basic Calculator App in Flutter
In the ever-evolving world of mobile app development, Flutter has emerged as a robust cross-platform framework, empowering developers to build stunning and intuitive applications. Among the multitude of possibilities, one project stands out as a fundamental exercise in Flutter proficiency: creating a basic calculator app. With its elegant UI components and robust event handling, Flutter provides an ideal playground to craft a calculator that seamlessly combines functionality and aesthetics.
In this article, we will embark on a journey through the essential steps to create a basic calculator app using Flutter, unlocking the door to your programming potential and reinforcing your understanding of this versatile framework. So, fasten your seatbelts as we dive into the world of Flutter and discover the art of building a calculator from scratch.

Step 1: Create a new Flutter project
To begin, create a new Flutter project named 'calculator_app' using your preferred IDE. Once completed, we will have our main.dart file loaded, along with the required files, utilizing the default Flutter starter project known as a counter app.
Step 2: Fetch the dependencies
After creating the project, navigate to the project directory and open the pubspec.yaml file. Add the following dependencies under the dependencies section:
dependencies:
  flutter:
    sdk: flutter
  math_expressions: ^2.4.0
Save the file and run the following command to fetch the dependencies:
flutter pub get
This will download and add the required dependencies to your Flutter project.
Step 3: Building the app
In the lib folder of your project, locate the main.dart file. Remove the existing code and replace it with the following code:
import 'package:calculator_app/calculator_view.dart';
import 'package:flutter/material.dart';

void main() {
  runApp(const MyApp());
}

class MyApp extends StatelessWidget {
  const MyApp({Key? key}) : super(key: key);

  @override
  Widget build(BuildContext context) {
    return MaterialApp(
      title: 'Calculator App',
      theme: ThemeData(
        primarySwatch: Colors.blue,
      ),
      debugShowCheckedModeBanner: false,
      home: const CalculatorView(),
    );
  }
}
The code above sets up the main entry point for your Flutter application named "Calculator App". The MyApp class is a StatelessWidget responsible for configuring the MaterialApp and defining the application's theme and home screen, which is set to CalculatorView.
Next, we create a new dart file “calculator_view”
Using the shortcut stful you will get a skeletal code of the Stateful Widget, and name it “CalculatorView”.
class CalculatorView extends StatefulWidget {
  const CalculatorView({Key? key}) : super(key: key);

  @override
  State<CalculatorView> createState() => _CalculatorViewState();
}

class _CalculatorViewState extends State<CalculatorView> {
  @override
  Widget build(BuildContext context) {
    return const Placeholder();
  }
}
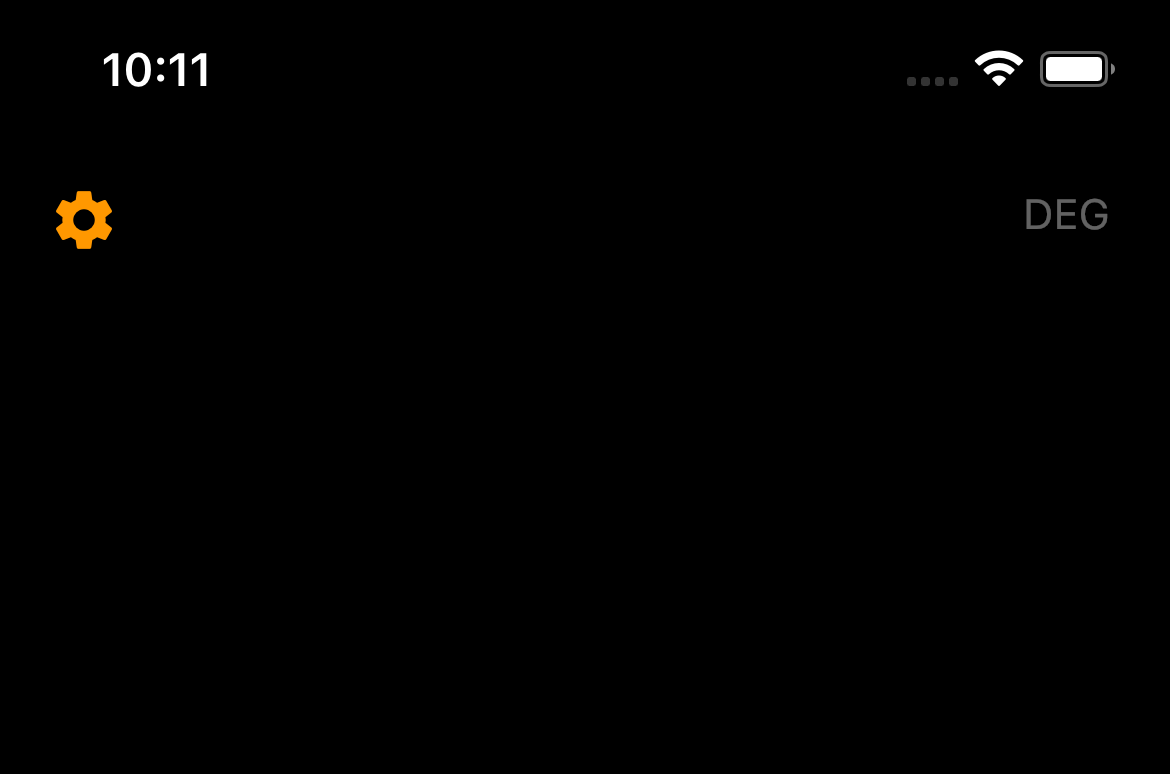
Next, we create the App Bar section. In order to do this, we create a Scaffold() widget wrapped in a SafeArea() widget. In AppBar() widget we provide the background color, leading icon, and the “DEG” text.
Update the above code with this code below
import 'package:flutter/material.dart';

class CalculatorView extends StatefulWidget {
  const CalculatorView({Key? key}) : super(key: key);

  @override
  State<CalculatorView> createState() => _CalculatorViewState();
}

class _CalculatorViewState extends State<CalculatorView> {

  @override
  Widget build(BuildContext context) {
    return Scaffold(
        backgroundColor: Colors.black54,
        appBar: AppBar(
          elevation: 0,
          backgroundColor: Colors.black54,
          leading: const Icon(Icons.settings, color: Colors.orange),
          actions: const [
            Padding(
              padding: EdgeInsets.only(top: 18.0),
              child: Text('DEG', style: TextStyle(color: Colors.white38)),
            ),
            SizedBox(width: 20),
          ],
        ),
        body: SafeArea(
          child: Column(),
        ));
  }
}
This should be displayed on your screen now.
Step 4: Building the full User Interface
Now let's create a new file called "calcButton.dart" in the lib folder. Inside the file, add the following code:
import 'package:flutter/material.dart';

Widget calcButton(
    String buttonText, Color buttonColor, void Function()? buttonPressed) {
  return Container(
    width: 75,
    height: buttonText == '=' ? 150 : 70,
    padding: const EdgeInsets.all(0),
    child: ElevatedButton(
      onPressed: buttonPressed,
      style: ElevatedButton.styleFrom(
          shape: const RoundedRectangleBorder(
              borderRadius:BorderRadius.all(Radius.circular(20))),
          backgroundColor: buttonColor),
      child: Text(buttonText,
        style: const TextStyle(fontSize: 27, color: Colors.white),
      ),
    ),
  );
}
calcButton is a helper function that returns a Widget representing a calculator button.
We then define our variables and function in the CalculatorViewState.
String equation = "0";
  String result = "0";
  String expression = "";
  double equationFontSize = 38.0;
  double resultFontSize = 48.0;

  buttonPressed(String buttonText) {

  }
In the body property of the Scaffold widget, we utilize a Column widget to organize the user interface elements. This Column widget will contain the display for the result and equation.
To achieve the desired layout, we set the mainAxisAlignment property of the Column widget to MainAxisAlignment.end. This ensures that the children within the Column are aligned to the bottom of the screen.
Next, we define the children property of the Column widget and include the following code snippet:
body: SafeArea(
  child: Column(
    mainAxisAlignment: MainAxisAlignment.end,
    children: [
      Align(
        alignment: Alignment.bottomRight,
        child: SingleChildScrollView(
          scrollDirection: Axis.horizontal,
          child: Column(
            crossAxisAlignment: CrossAxisAlignment.end,
            children: [
              Row(
                mainAxisAlignment: MainAxisAlignment.end,
                children: <Widget>[
                  Padding(
                      padding: const EdgeInsets.all(10.0),
                      child: Text(result,
                          textAlign: TextAlign.left,
                          style: const TextStyle(
                              color: Colors.white, fontSize:80))),
                  const Icon(Icons.more_vert,
                      color: Colors.orange, size: 30),
                  const SizedBox(width: 20),
                ],
              ),
              Row(
                mainAxisAlignment: MainAxisAlignment.end,
                children: [
                  Padding(
                    padding: const EdgeInsets.all(20),
                    child: Text(equation,
                        style: const TextStyle(
                          fontSize: 40,
                          color: Colors.white38,
                        )),
                  ),
                  IconButton(
                    icon: const Icon(Icons.backspace_outlined,
                        color: Colors.orange, size: 30),
                    onPressed: () {
                      buttonPressed("⌫");
                    },
                  ),
                  const SizedBox(width: 20),
                ],
              )
            ],
          ),
        ),
      ),
    ],
  )
Step 5: Adding buttons to the User Interface
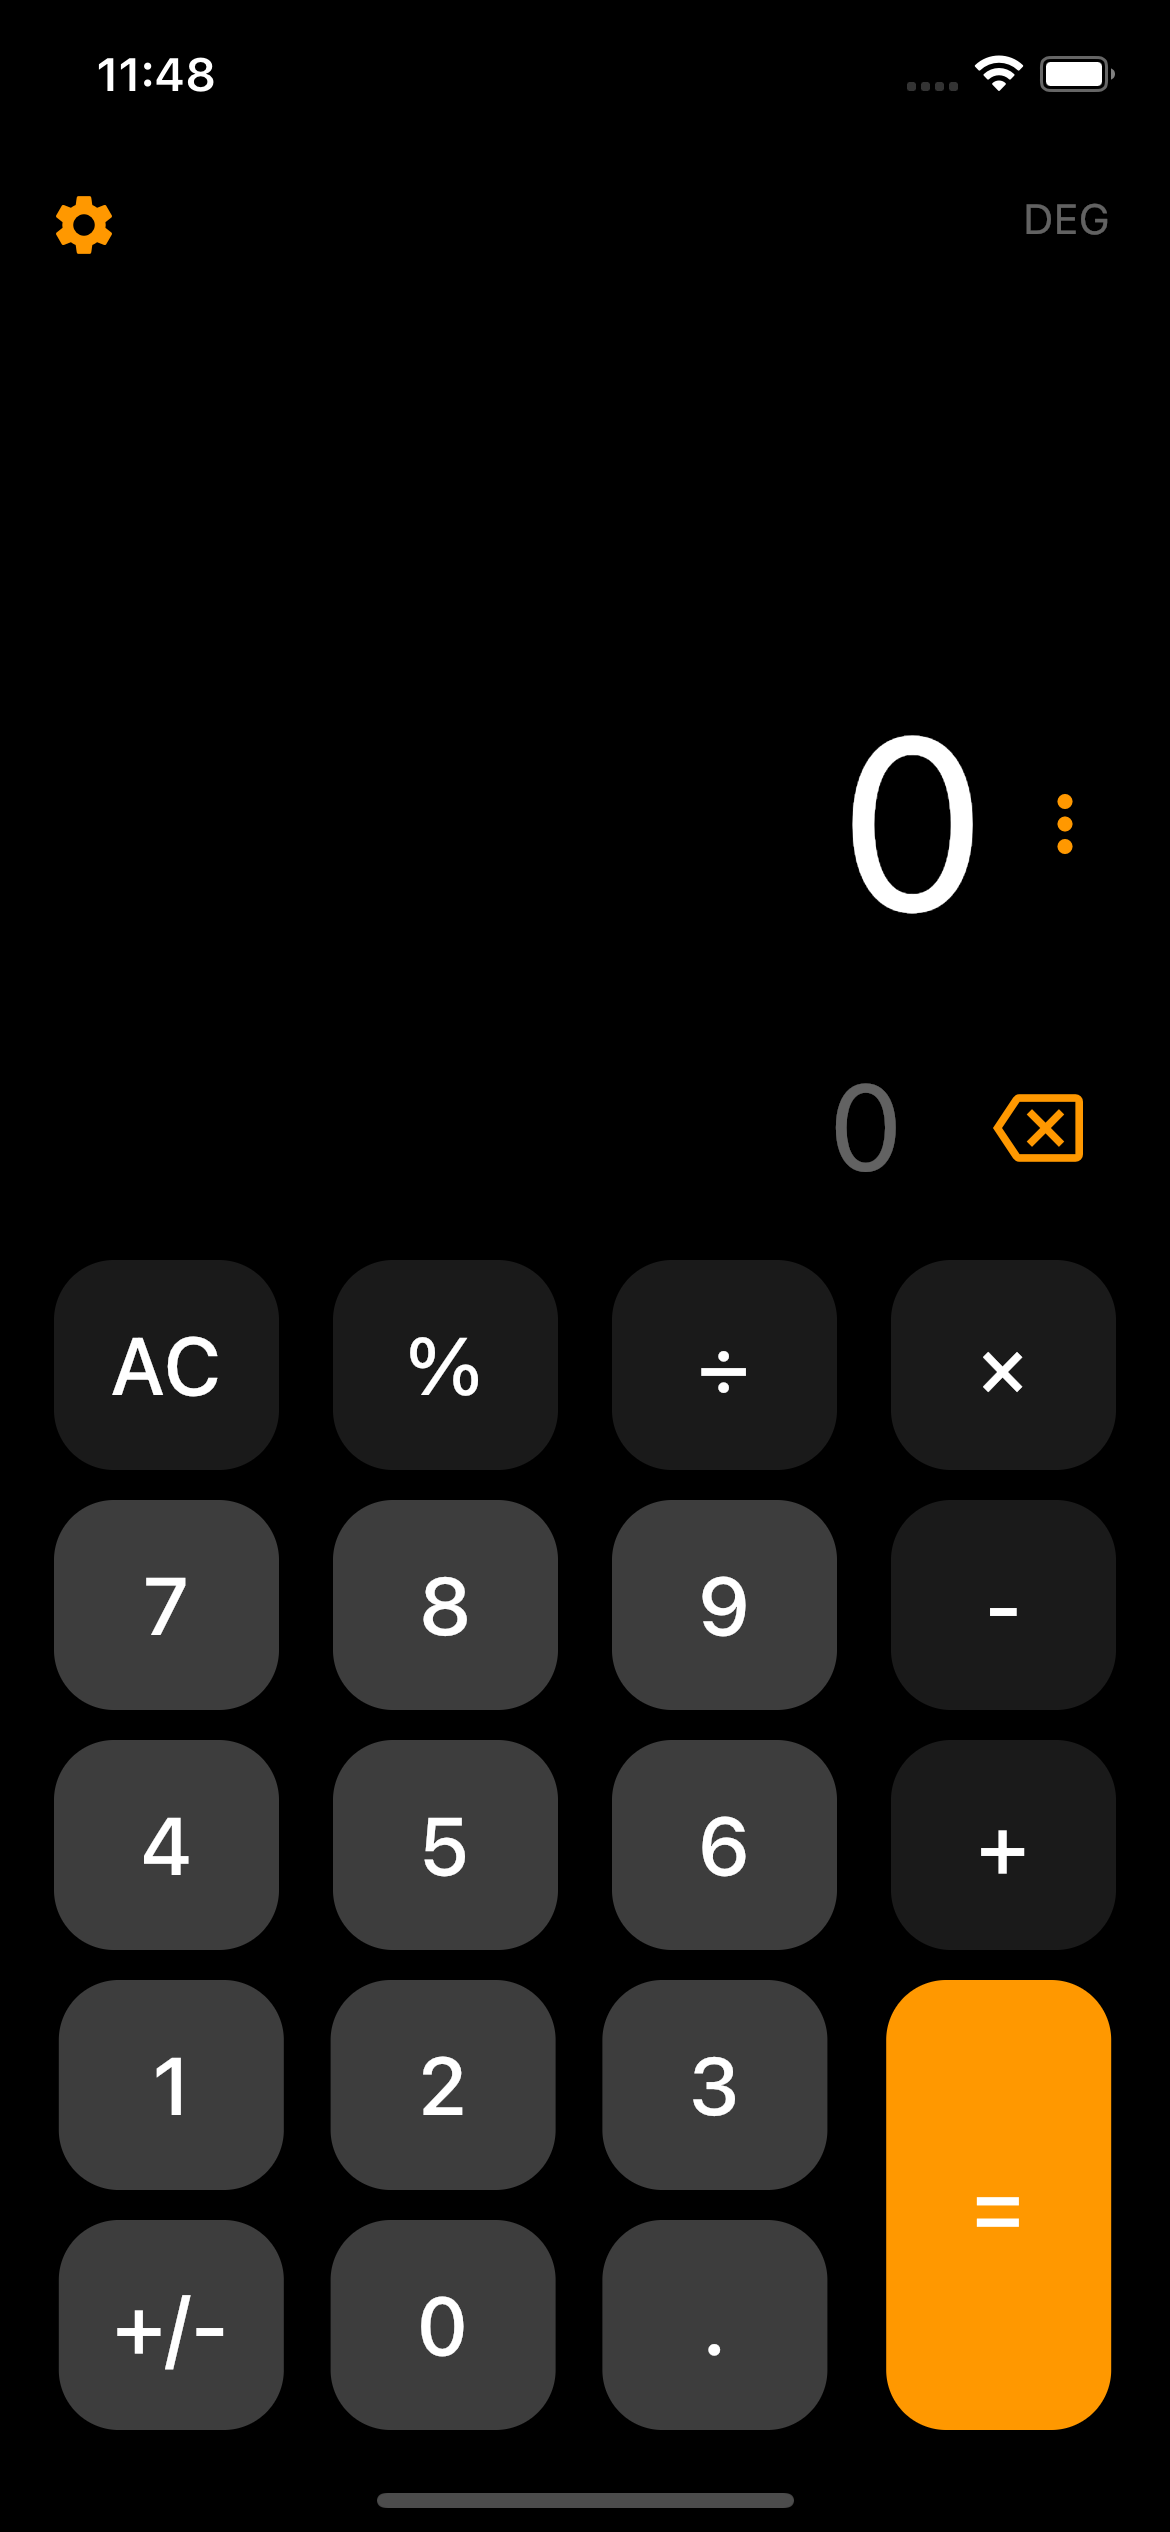
Now let's take a look at the calculator buttons that allow users to input numbers and perform calculations. These buttons are organized in rows and columns to provide a user-friendly interface. Here's the code snippet for the calculator buttons: paste it within the Column() after the Align() widget.
Row(
                mainAxisAlignment: MainAxisAlignment.spaceEvenly,
                children: [
                  calcButton('AC', Colors.white10, () => buttonPressed('AC')),
                  calcButton('%', Colors.white10, () => buttonPressed('%')),
                  calcButton('÷', Colors.white10, () => buttonPressed('÷')),
                  calcButton("×", Colors.white10, () => buttonPressed('×')),
                ],
              ),
              const SizedBox(height: 10),

              Row(
                mainAxisAlignment: MainAxisAlignment.spaceEvenly,
                children: [
                  calcButton('7', Colors.white24, () => buttonPressed('7')),
                  calcButton('8', Colors.white24, () => buttonPressed('8')),
                  calcButton('9', Colors.white24, () => buttonPressed('9')),
                  calcButton('-', Colors.white10, () => buttonPressed('-')),
                ],
              ),
              const SizedBox(height: 10),

              Row(
                mainAxisAlignment: MainAxisAlignment.spaceEvenly,
                children: [
                  calcButton('4', Colors.white24, () => buttonPressed('4')),
                  calcButton('5', Colors.white24, () => buttonPressed('5')),
                  calcButton('6', Colors.white24, () => buttonPressed('6')),
                  calcButton('+', Colors.white10, () => buttonPressed('+')),
                ],
              ),
              const SizedBox(height: 10),
              // calculator number buttons

              Row(
                mainAxisAlignment: MainAxisAlignment.spaceEvenly,
                children: [
                  Column(
                    //mainAxisAlignment: MainAxisAlignment.spaceAround
                    children: [
                      Row(
                        children: [
                          calcButton(
                              '1', Colors.white24, () => buttonPressed('1')),
                          SizedBox(
                              width: MediaQuery.of(context).size.width * 0.04),
                          calcButton(
                              '2', Colors.white24, () => buttonPressed('2')),
                         SizedBox(
                              width: MediaQuery.of(context).size.width * 0.04),
                          calcButton(
                              '3', Colors.white24, () => buttonPressed('3')),
                        ],
                      ),
                      const SizedBox(height: 10),
                      Row(
                        mainAxisAlignment: MainAxisAlignment.spaceEvenly,
                        children: [
                          calcButton('+/-', Colors.white24,
                              () => buttonPressed('+/-')),
                          SizedBox(
                              width: MediaQuery.of(context).size.width * 0.04),
                          calcButton(
                              '0', Colors.white24, () => buttonPressed('0')),
                          SizedBox(
                              width: MediaQuery.of(context).size.width * 0.04),
                          calcButton(
                              '.', Colors.white24, () => buttonPressed('.')),
                        ],
                      ),
                    ],
                  ),
                  calcButton('=', Colors.orange, () =>                         buttonPressed('=')),
                ],
              )
You should have this in your UI now 💃💃
Step 6: Implement the calculator logic
In the _CalculatorViewState class, the empty section of our buttonPressed method is now updated to the code snippet below.
buttonPressed(String buttonText) {
    // used to check if the result contains a decimal
    String doesContainDecimal(dynamic result) {
      if (result.toString().contains('.')) {
        List<String> splitDecimal = result.toString().split('.');
        if (!(int.parse(splitDecimal[1]) > 0)) {
          return result = splitDecimal[0].toString();
        }
      }
      return result;
    }

    setState(() {
      if (buttonText == "AC") {
        equation = "0";
        result = "0";
      } else if (buttonText == "⌫") {
        equation = equation.substring(0, equation.length - 1);
        if (equation == "") {
          equation = "0";
        }
      } else if (buttonText == "+/-") {
        if (equation[0] != '-') {
          equation = '-$equation';
        } else {
          equation = equation.substring(1);
        }
      } else if (buttonText == "=") {
        expression = equation;
        expression = expression.replaceAll('×', '*');
        expression = expression.replaceAll('÷', '/');
        expression = expression.replaceAll('%', '%');

        try {
          Parser p = Parser();
          Expression exp = p.parse(expression);

          ContextModel cm = ContextModel();
          result = '${exp.evaluate(EvaluationType.REAL, cm)}';
          if (expression.contains('%')) {
            result = doesContainDecimal(result);
          }
        } catch (e) {
          result = "Error";
        }
      } else {
        if (equation == "0") {
          equation = buttonText;
        } else {
          equation = equation + buttonText;
        }
      }
    });
  }
The doesContainDecimal function checks if a dynamic result value contains a decimal point and returns a modified result if it does not have any decimal places.
The function checks if the integer value of the second substring int.parse(splitDecimal[1]) is greater than 0. If it is not, it means that the decimal portion of the number is 0 or empty. In that case, the function modifies result by assigning the first substring (before the decimal point) to it, using result = splitDecimal[0].toString(). This removes the decimal portion from the number.
This function is used for the Modulo operation.
AC (All Clear) Button:
If the "AC" button is pressed, the equation and result are set to "0," effectively resetting the calculator.
⌫ (Backspace) Button:
When the ⌫ button is pressed, the last character is removed from the equation string. If the equation becomes empty, it is set to "0" to maintain a valid equation state.
+/- (Positive/Negative Toggle) Button:
Pressing the +/- button changes the sign of the equation. If the equation doesn't start with a negative sign, it adds a negative sign at the beginning. If it already has a negative sign, it removes it.
\= (Equals) Button:
When the equals button is pressed, the equation is assigned to the expression variable.
Custom symbols such as '×' and '÷' are replaced with their corresponding mathematical operators (* and /) in the expression.
The expression is then parsed and evaluated using a mathematical expression parser from math_expressions package.
If the evaluation is successful, the result is assigned to the result variable and displayed to the user. If the expression contains a percentage sign (%), the doesContainDecimal function checks if the result is a whole number or contains decimals for accurate representation. Otherwise, if an error occurs during evaluation, the result is set to "Error".
And that’s all. We have completed building our basic Flutter calculator.
Here’s the link to the full code on GitHub.
https://github.com/Syntax007/calculator_app
Thanks for following this article till the end. Please like & comment, if you found this article beneficial to you.

